OUR STORY
Saladmaster is an American Company that began in 1946, founded by Mr. Harry Lemmons. We specialize in Healthy & Nutrition Cooking Systems. Saladmaster has transformed the lives of millions around the world, in changing life one healthy meal at a time and the opportunity to share it to the world.

SALADMASTER HISTORY SAYS IT ALl
In 2021, Saladmaster celebrated the 75th Year of Changing Lives. Saladmaster is one of the most trusted brands in the world. Our commitment to quality and excellence can be seen through our premium products. Our attention to detail and craftsmanship in our legacy of manufacturing is always hand checked for quality and built to pass down to generations. The love for our products and brand is undeniable as we want to change life through healthy cooking.
Saladmaster was built on integrity, hard work and the drive to change lives. People want to lead healthy lives, to live longer, look and feel better and today the opportunity and product are more relevant than ever.
Saladmaster was built on integrity, hard work and the drive to change lives. People want to lead healthy lives, to live longer, look and feel better and today the opportunity and product are more relevant than ever.

Video can’t be displayed
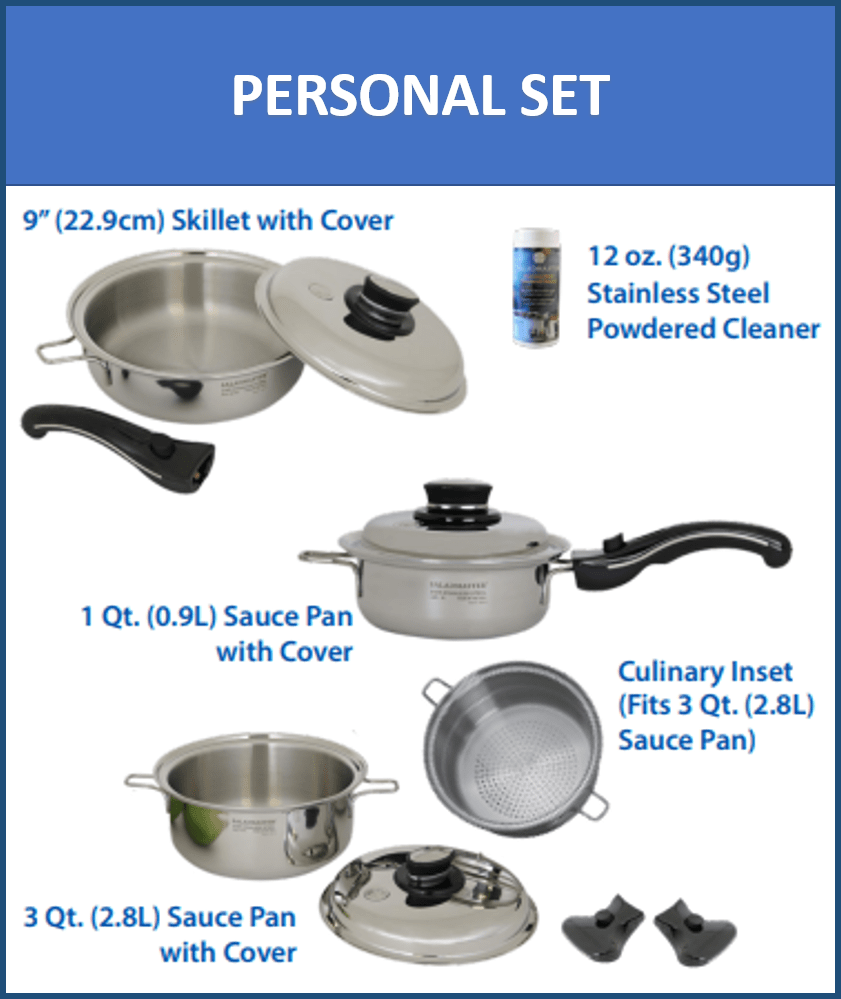
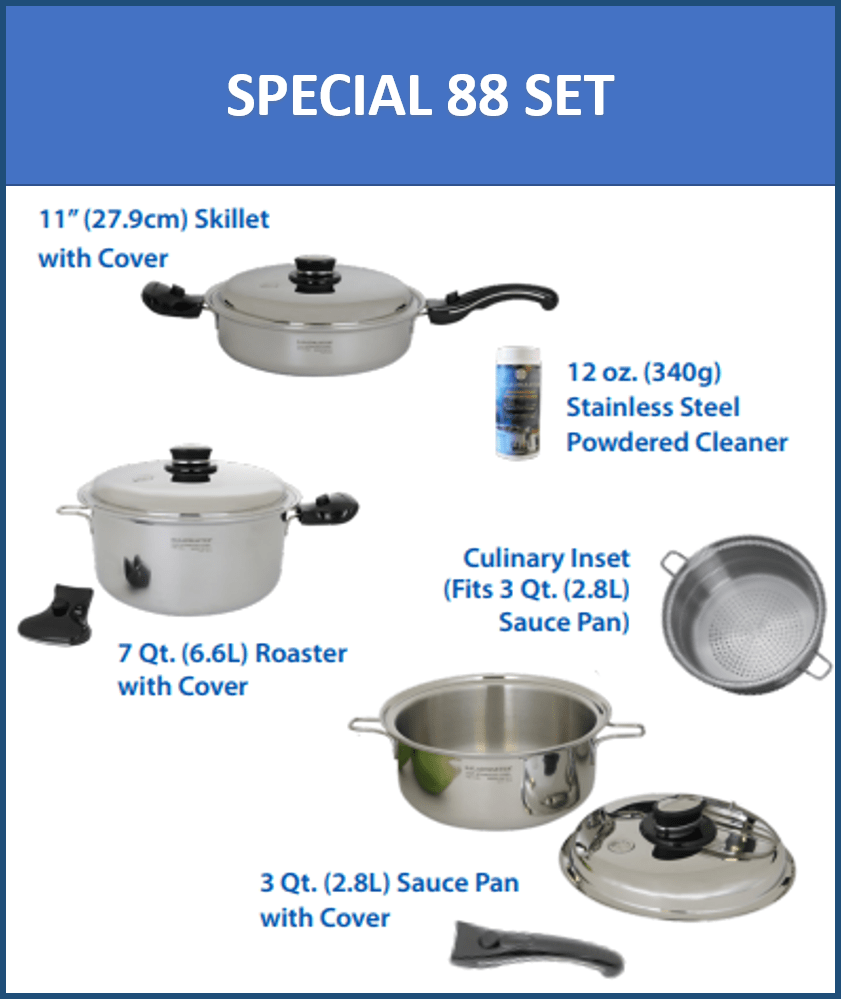
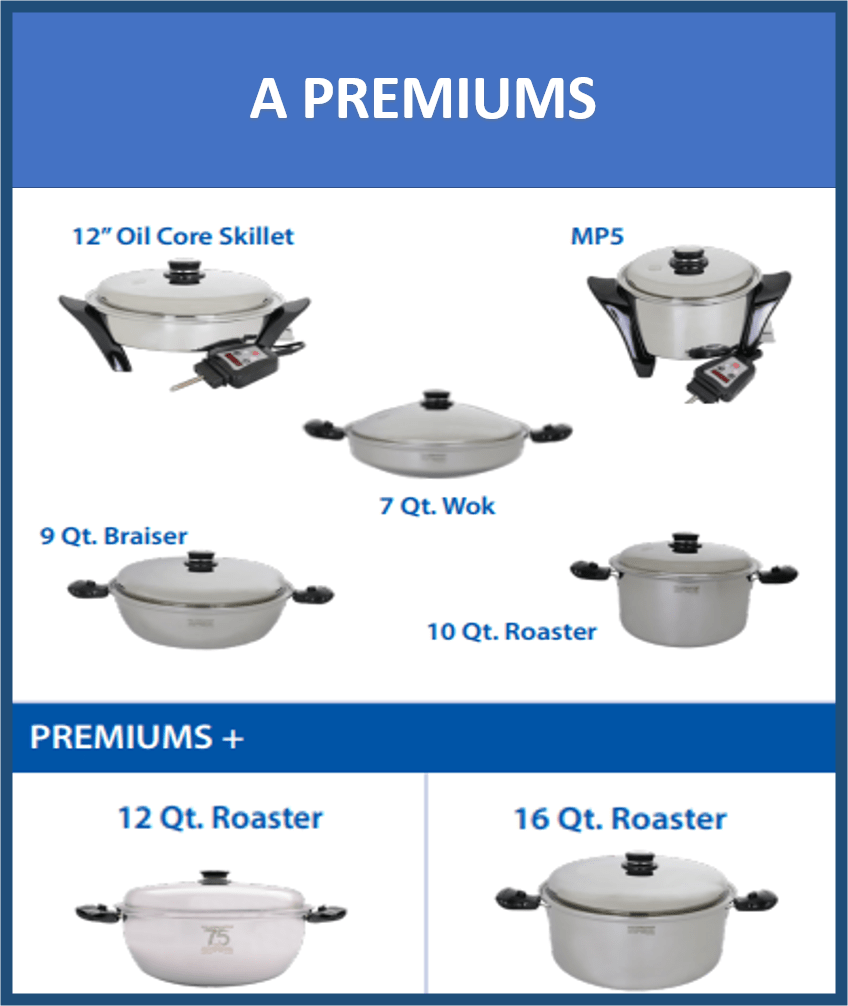
OUR PRODUCTS


.png)
CARE & USE

Video can’t be displayed
Installation

Video can’t be displayed
Polishing

Video can’t be displayed
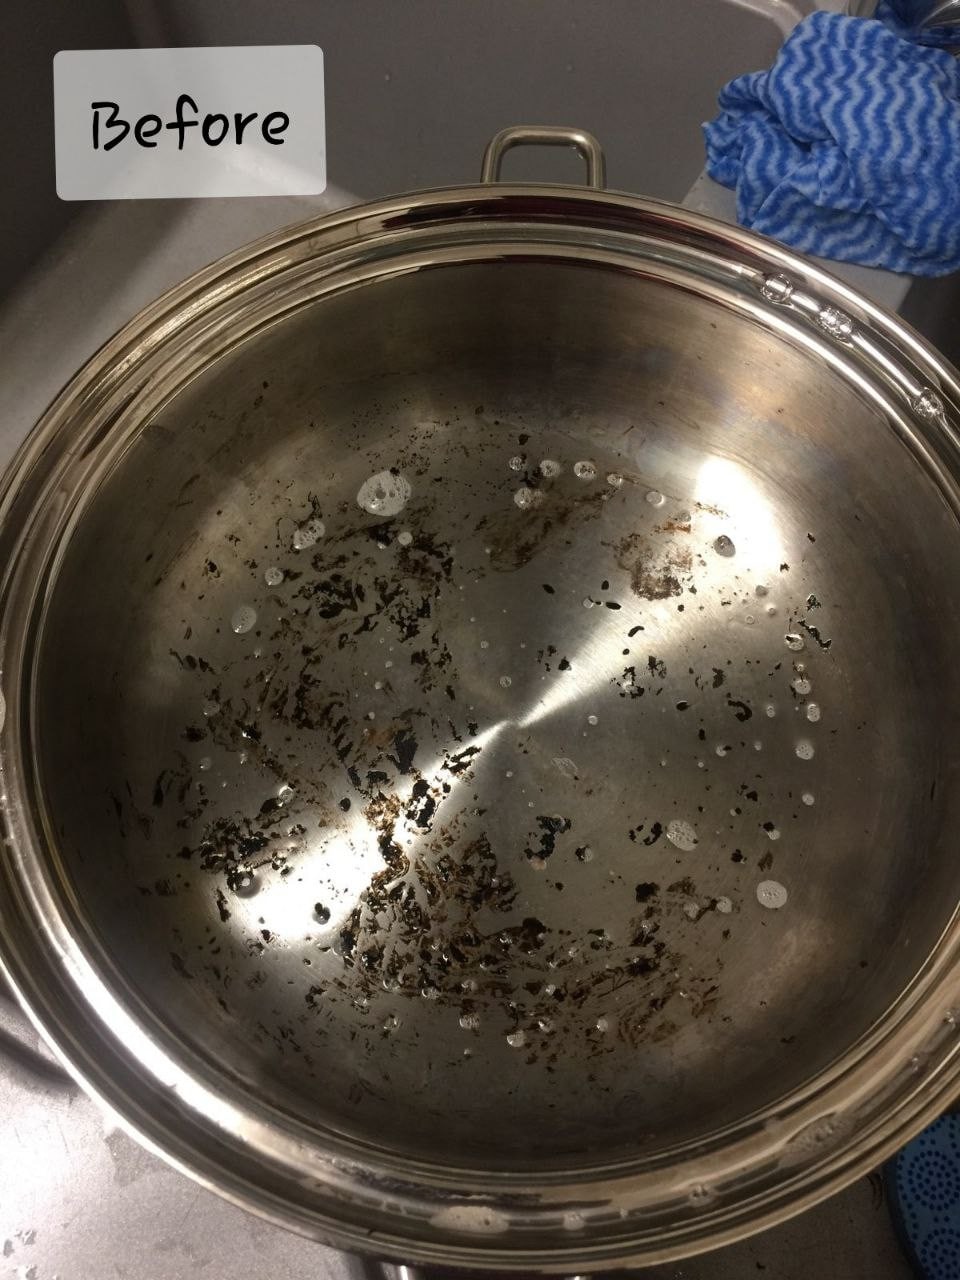
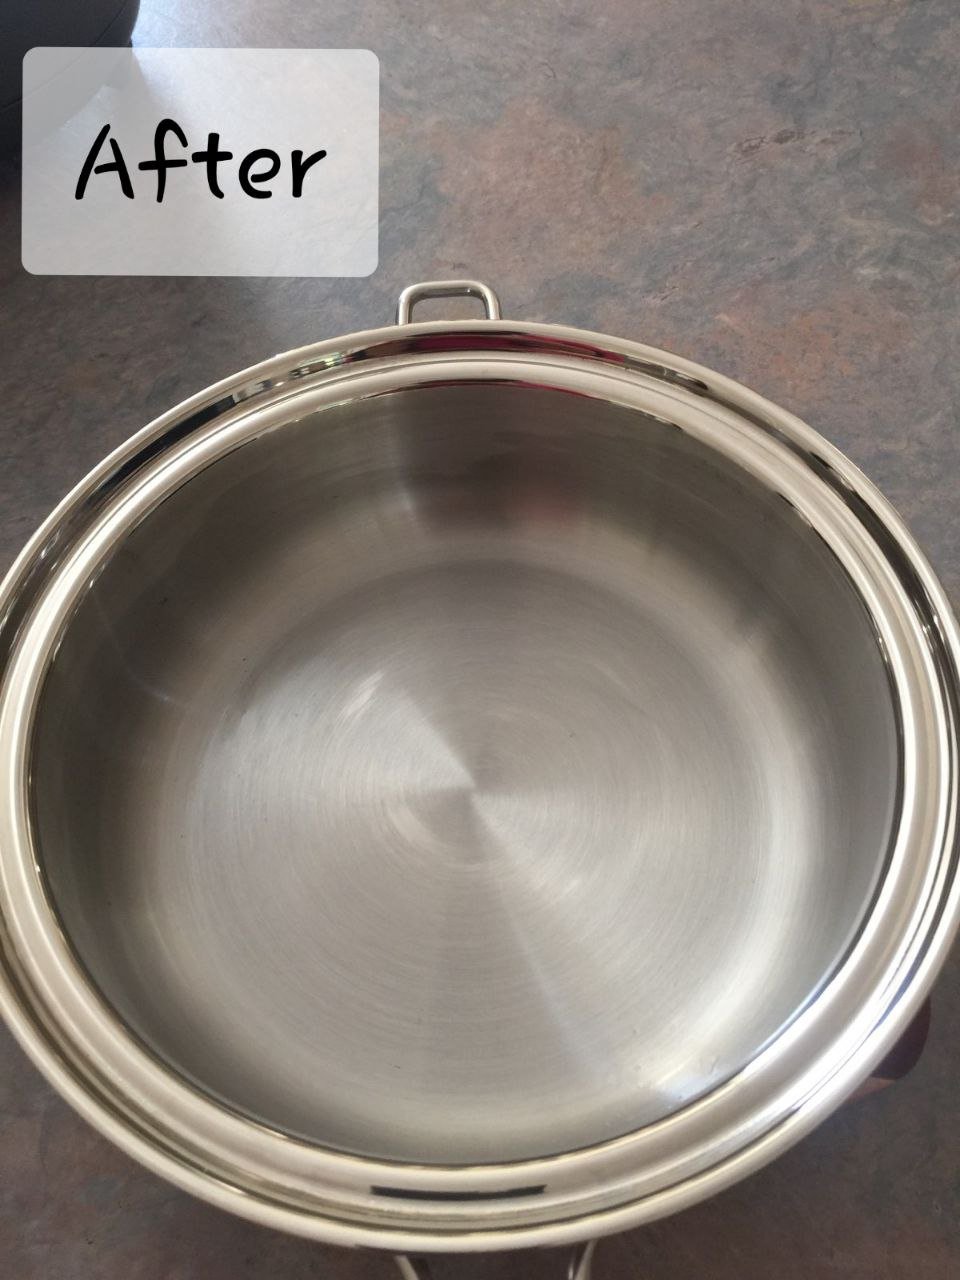
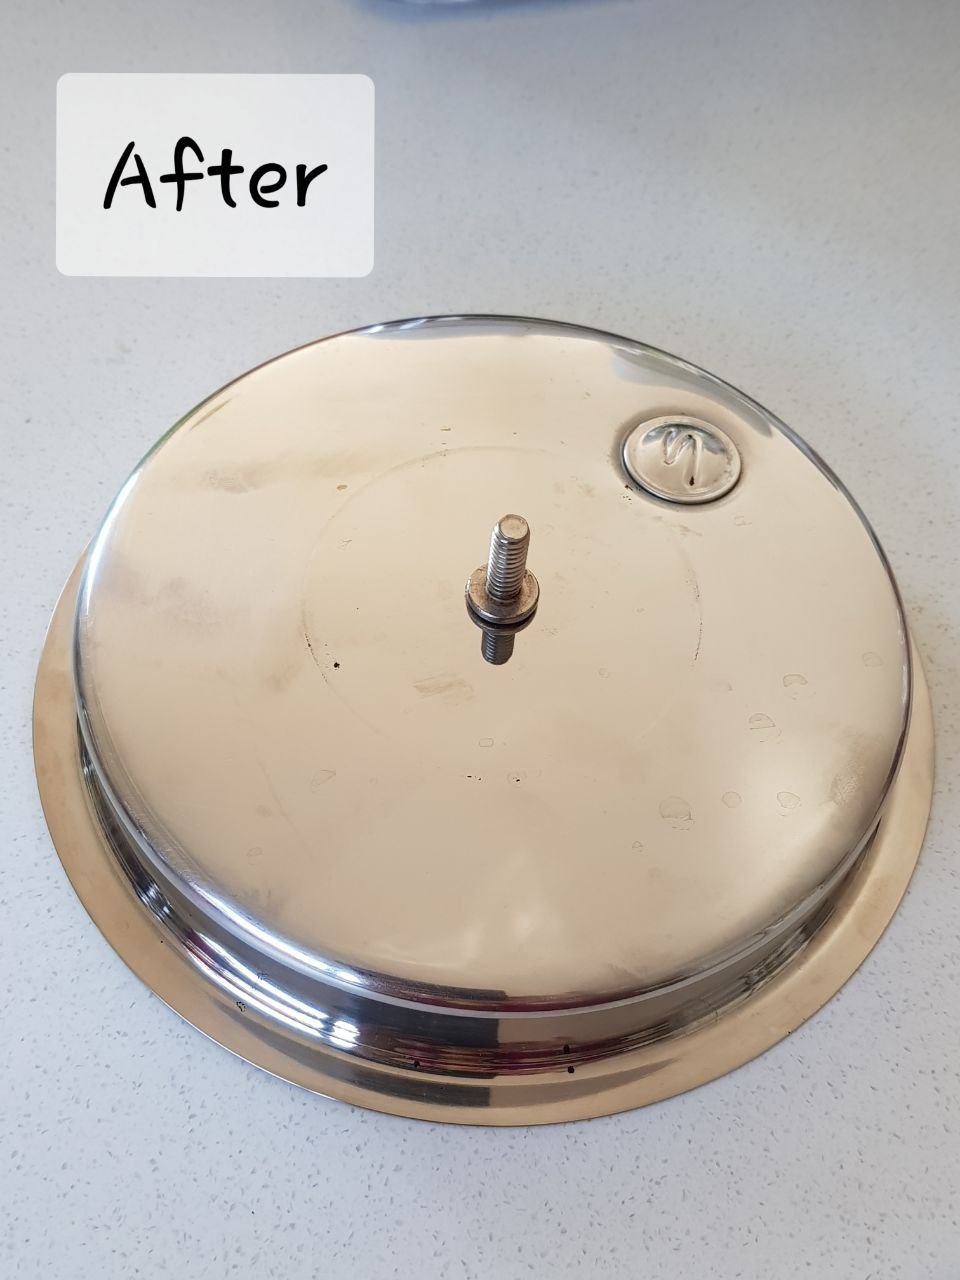
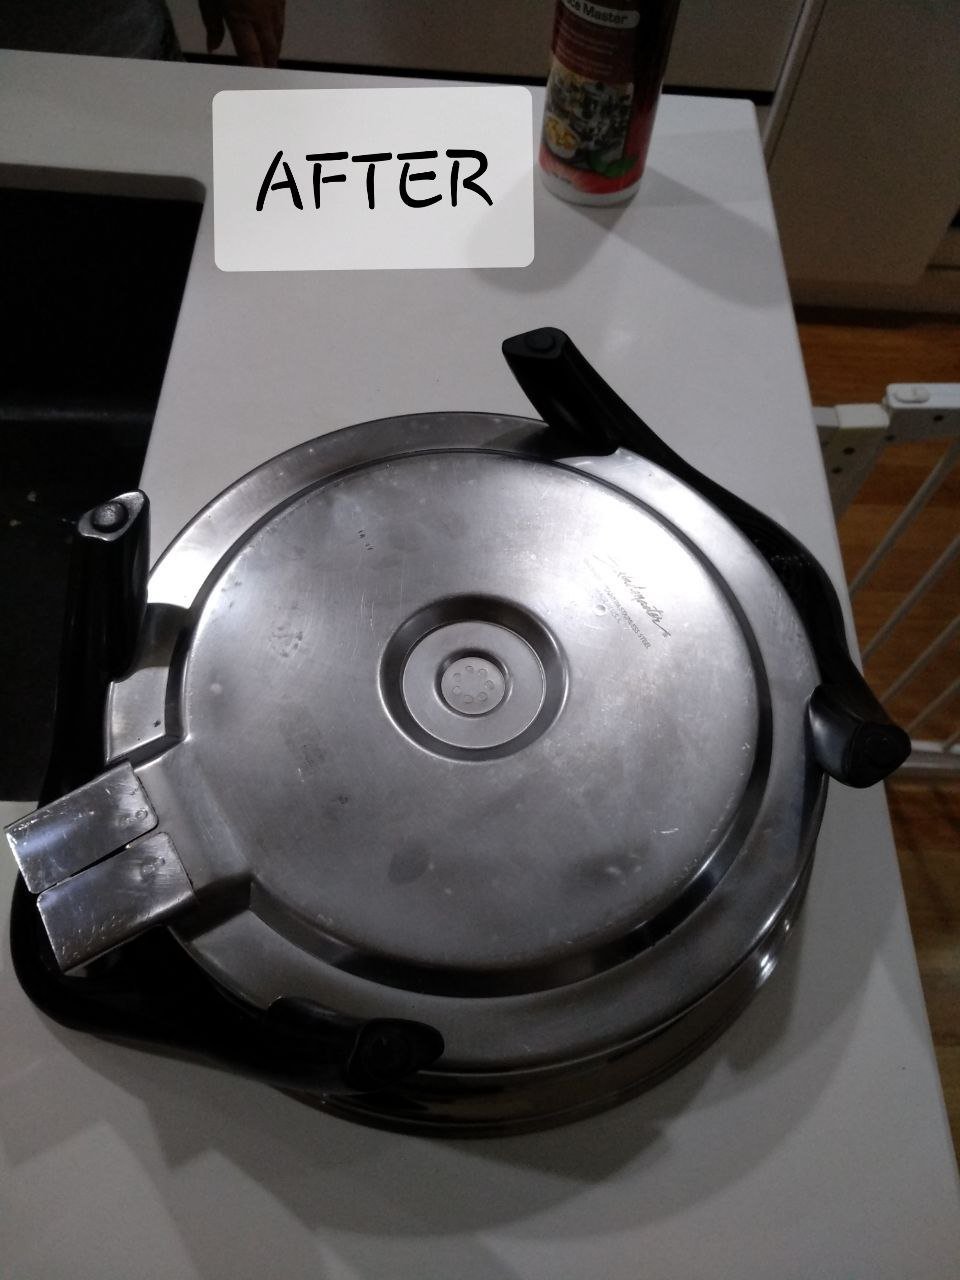
Cleaning Stubborn Food Residues

Video can’t be displayed
CLEANING BURNT FOOD RESIDUES
cooking videos

Video can’t be displayed
Frying in Saladmaster doesn't use any oil and salt. Healthy, nutritious and flavoursome, quick and easy cooking.
Video can’t be displayed
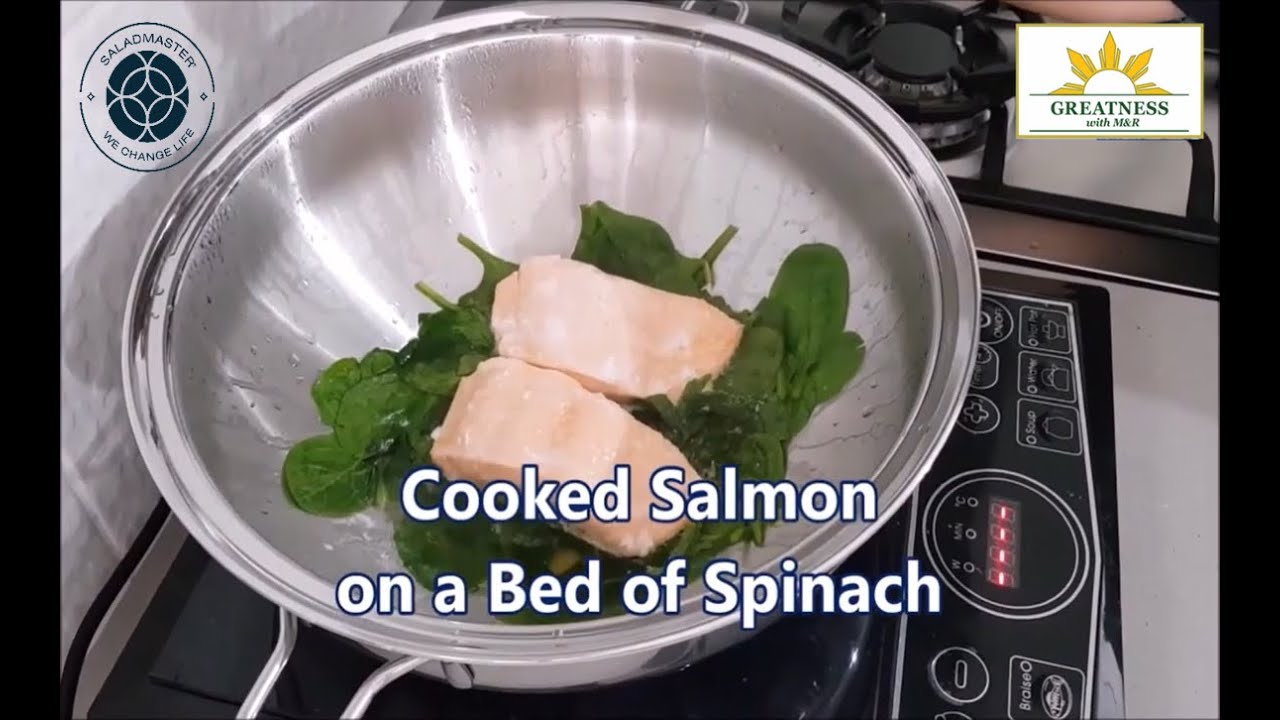
Saladmaster Cooked Salmon, authentic (no salt or seasoning), no fishy smell while cooking, Quick, simple, easy, flavoursome and nutritious, the healthy way of cooking.

Video can’t be displayed
Saladmaster Healthy Cake baked on the stovetop for 15-20 minutes with very low flame. Very nutritious and economical way to enjoy healthy snacks or desserts.

Video can’t be displayed
Amazing Saladmaster Machine!!! Enjoy your Salads with all natural ingredients, very tasty and nutritious. Natural dressing means no preservatives.

Video can’t be displayed
With Saladmaster waterless cooking retains the nutrients and no shrinkage. Easy, very flavoursome and nutritious (cooked under 90 degrees Celsius). Even the egg is cooked with very minimal moisture. Salt experiment: Salt is sodium (mineral), representing the mineral of the vegetables. Salt is dry, which means the minerals in vegetables are retained.

Video can’t be displayed
Easy and nutritious, Saladmaster misted potatoes (not steamed), retaining all its natural flavour and nutrients, Diabetes friendly.
Customer Service
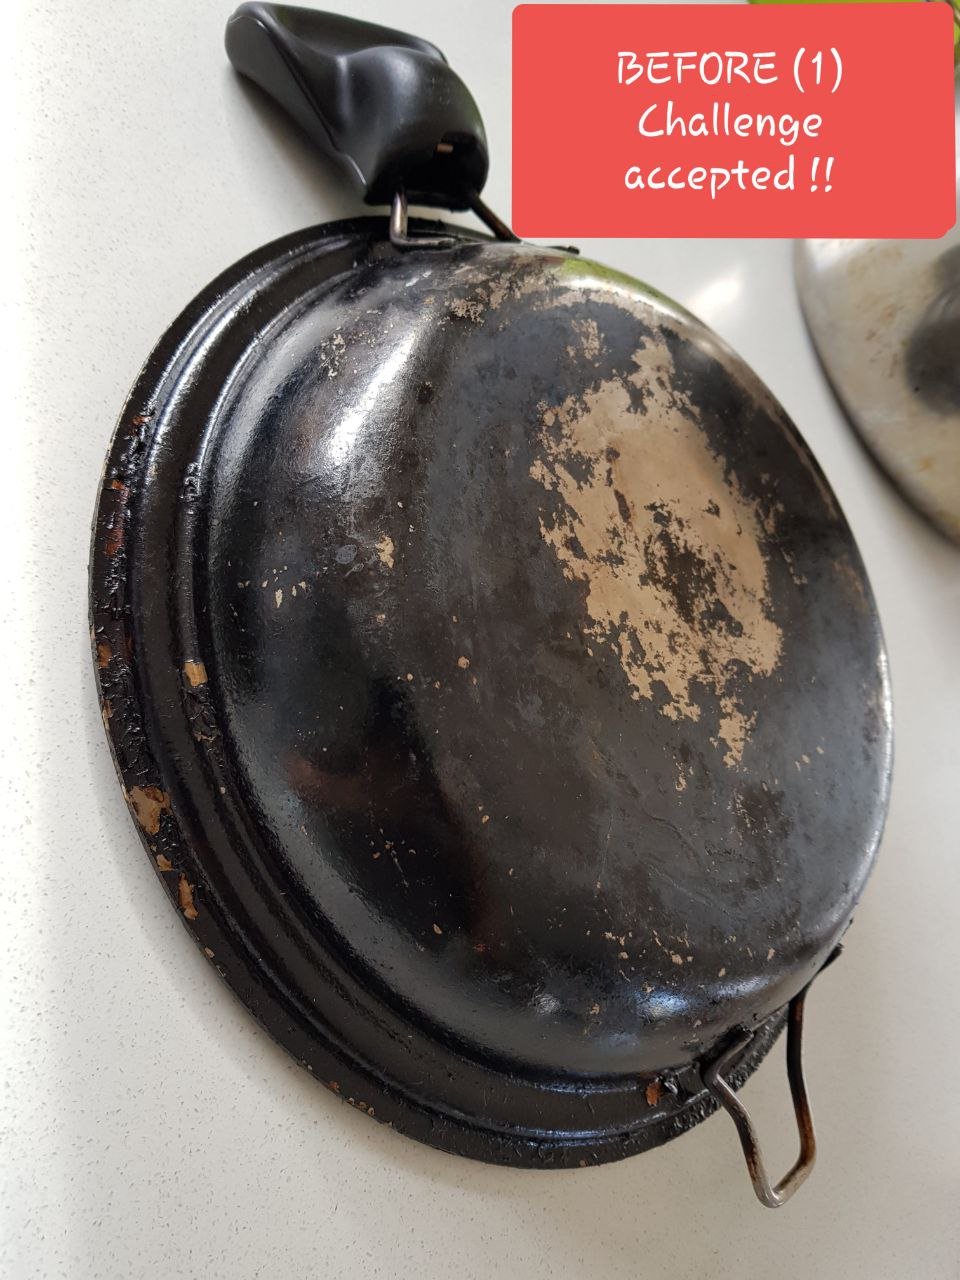
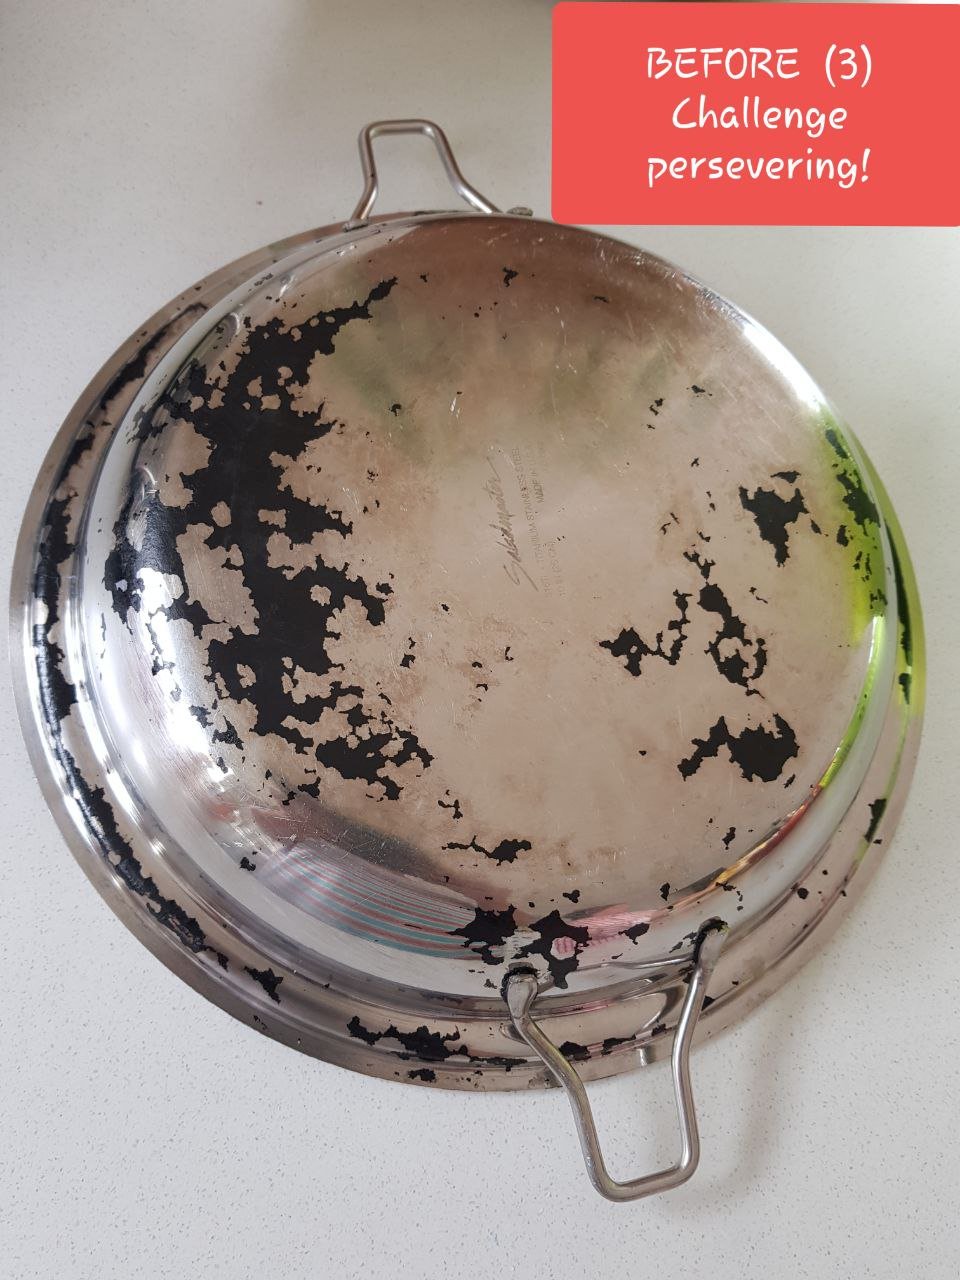
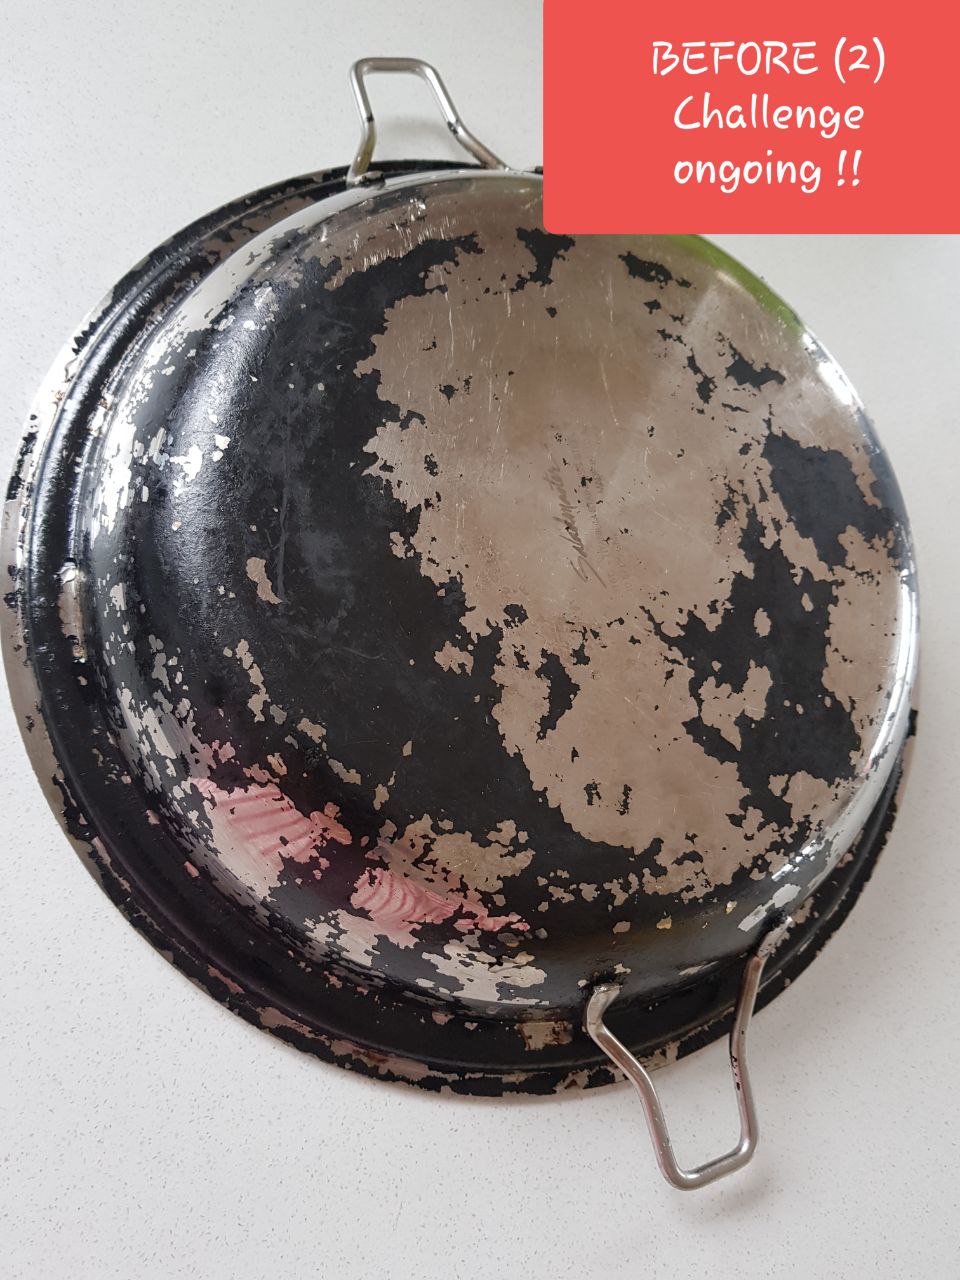
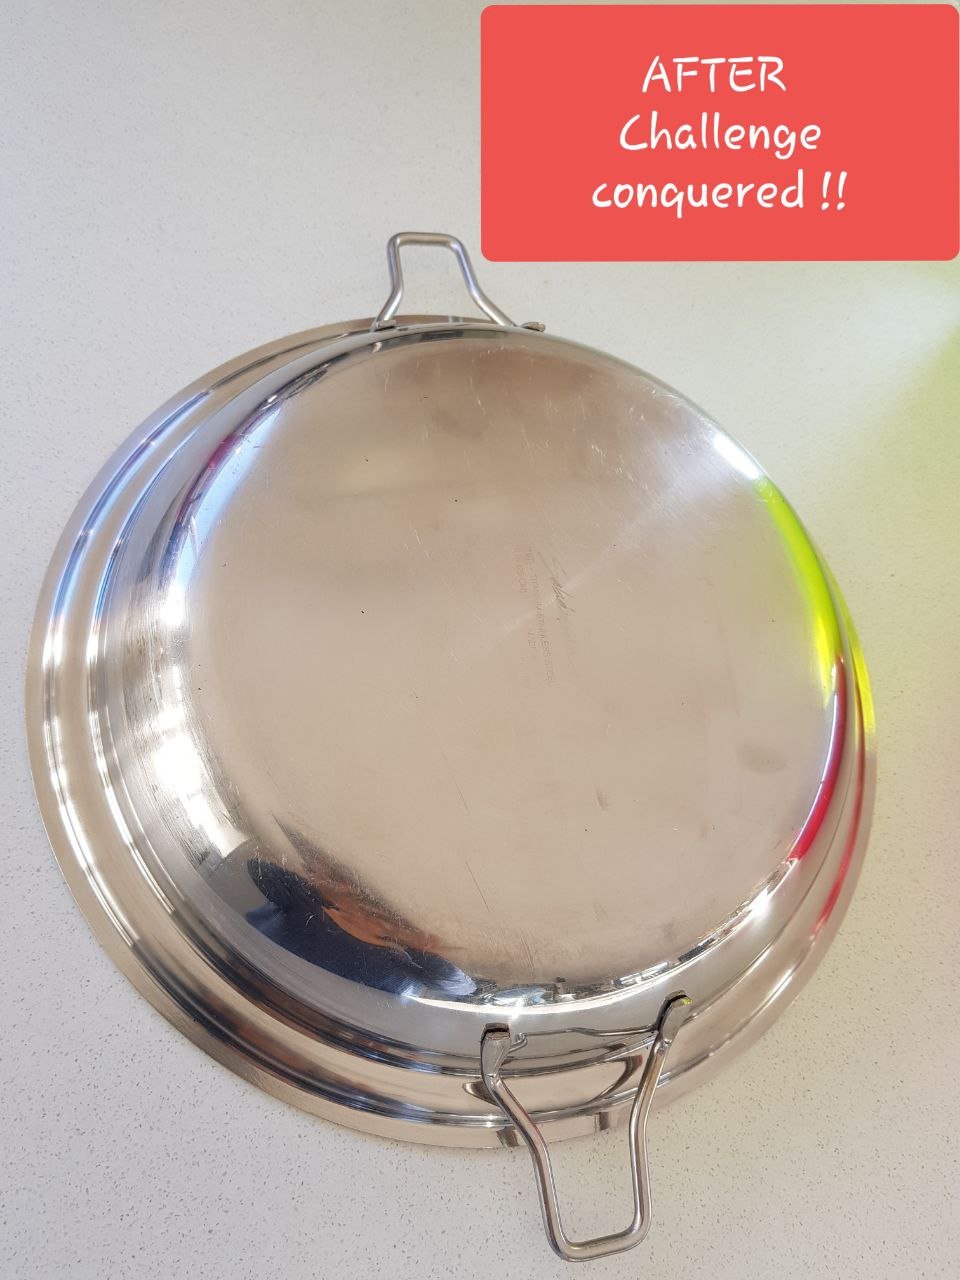
To keep your cookware looking pristine, shiny and new, we will show you how to. We can bring your cookware back to life!


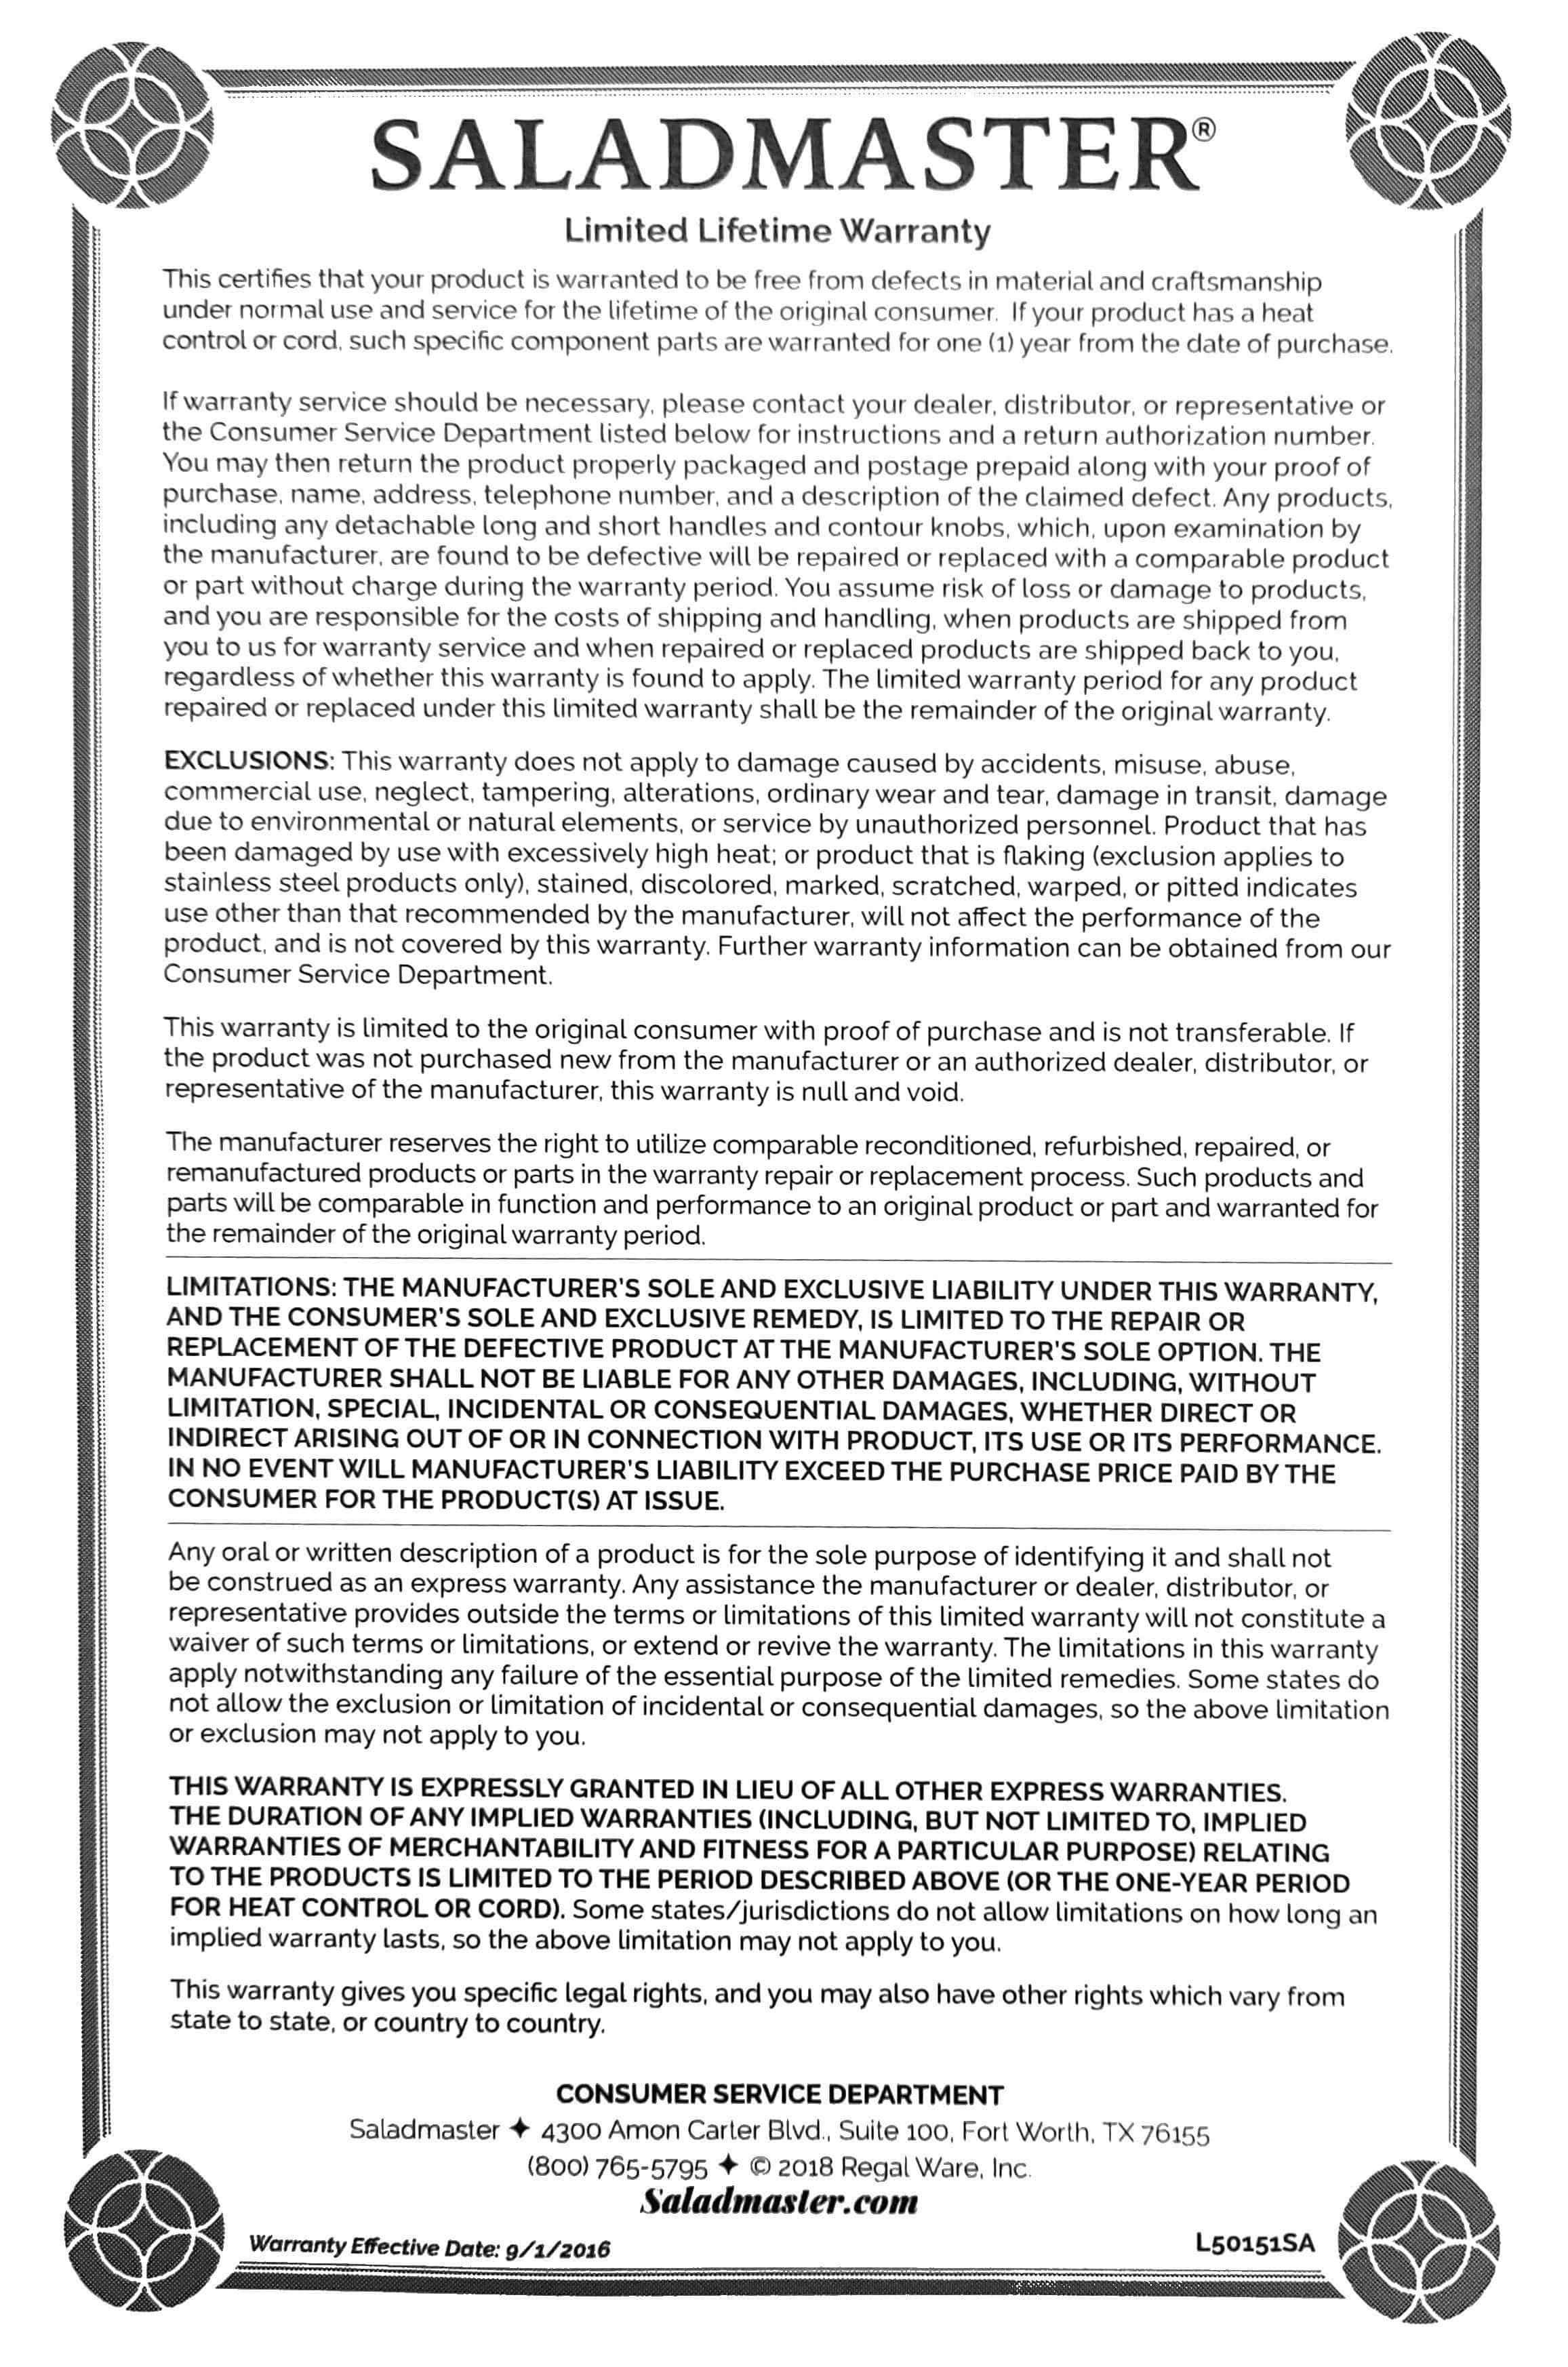
Limited Lifetime Warranty
SALADMASTER CUSTOMERS FREQUENTLY ASKED QUESTIONS
CLEANING YOUR SALADMASTER COOKWARE
Before First UseHand wash each piece of your new Saladmaster cooking system, including the handles, in warm, soapy water. Add one cup of vinegar per 4 liters of water and wash thoroughly. This removes all traces of any residual manufacturing oils polishing compounds and any shipping debris. Rinse in clear, warm water and dry thoroughly with a clean, soft towel.
It is also advisable to soak in 30 minutes. Do not stack on top of each other while soaking to avoid scratches and damages.
Normal CleaningAfter each use, remove handles and wash both the cookware and handles in warm, soapy water. Rinse and dry. You may also remove the handles and clean your cookware in the dishwasher. Use only non-abrasive cleaners on the handles and avoid cleaning handles in the dishwasher.
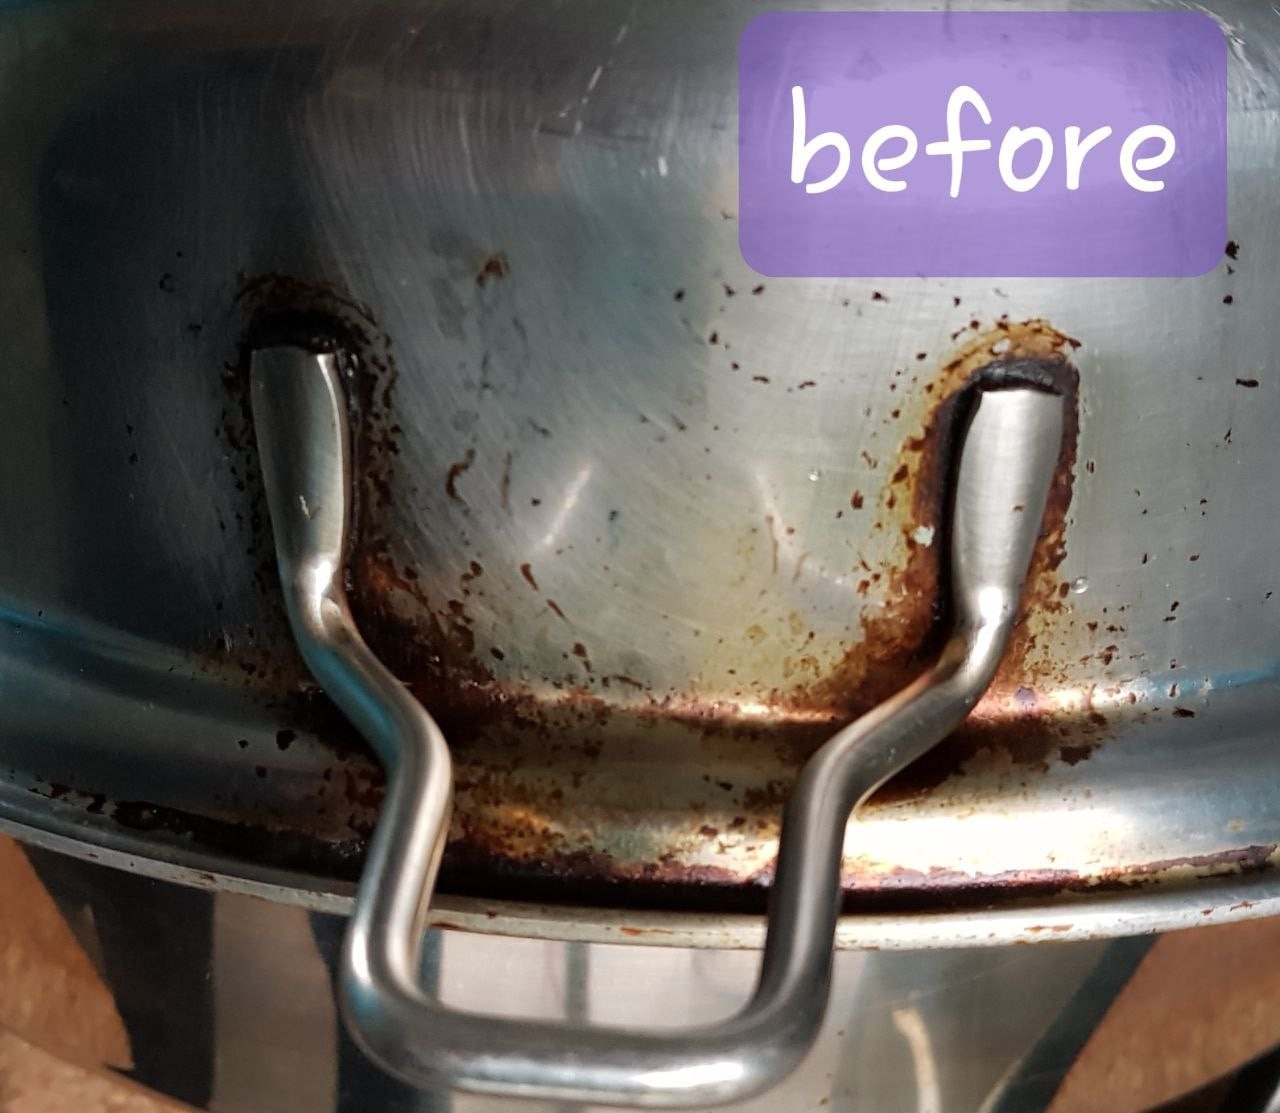
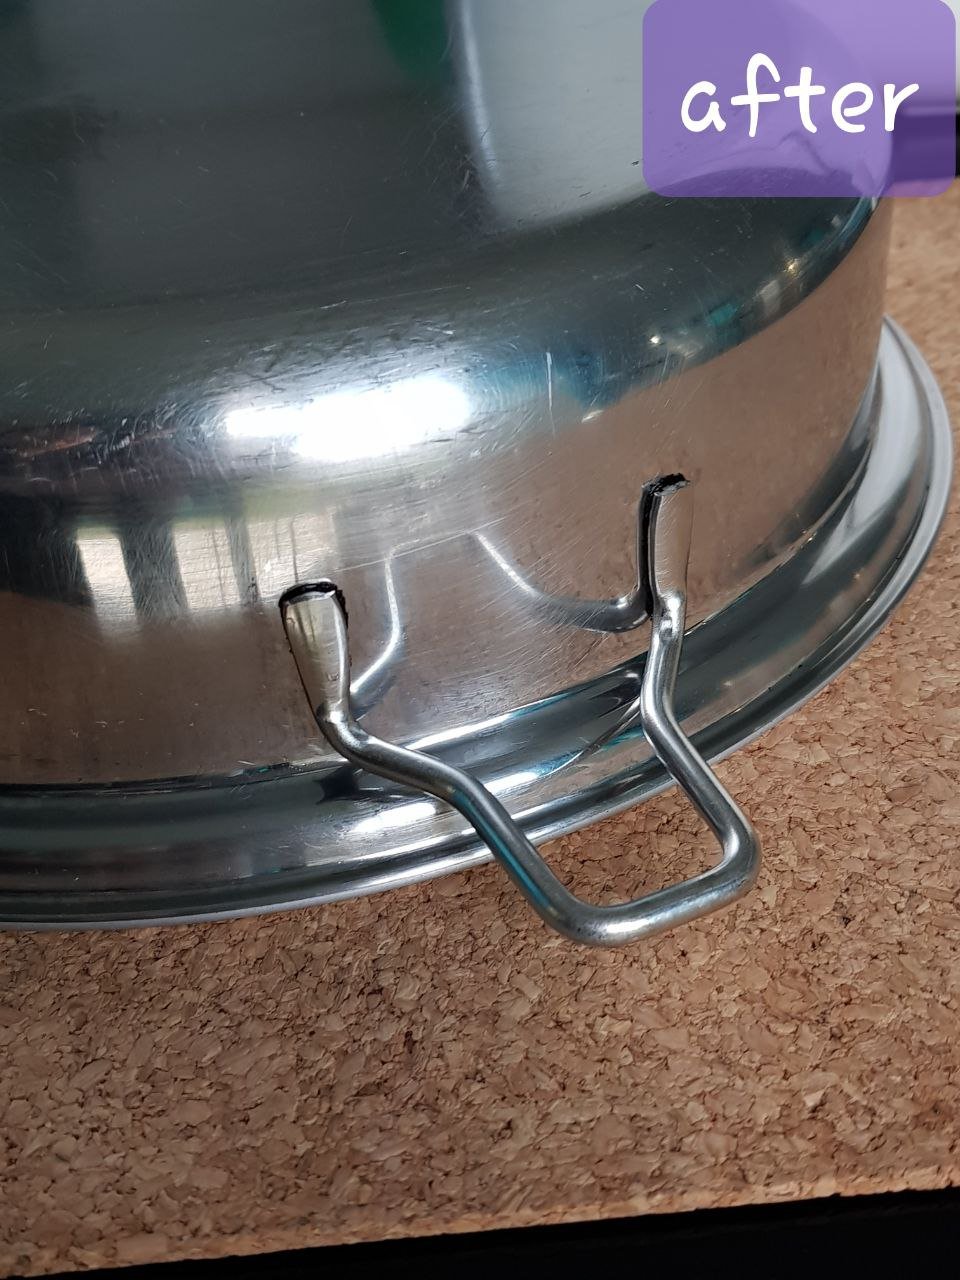
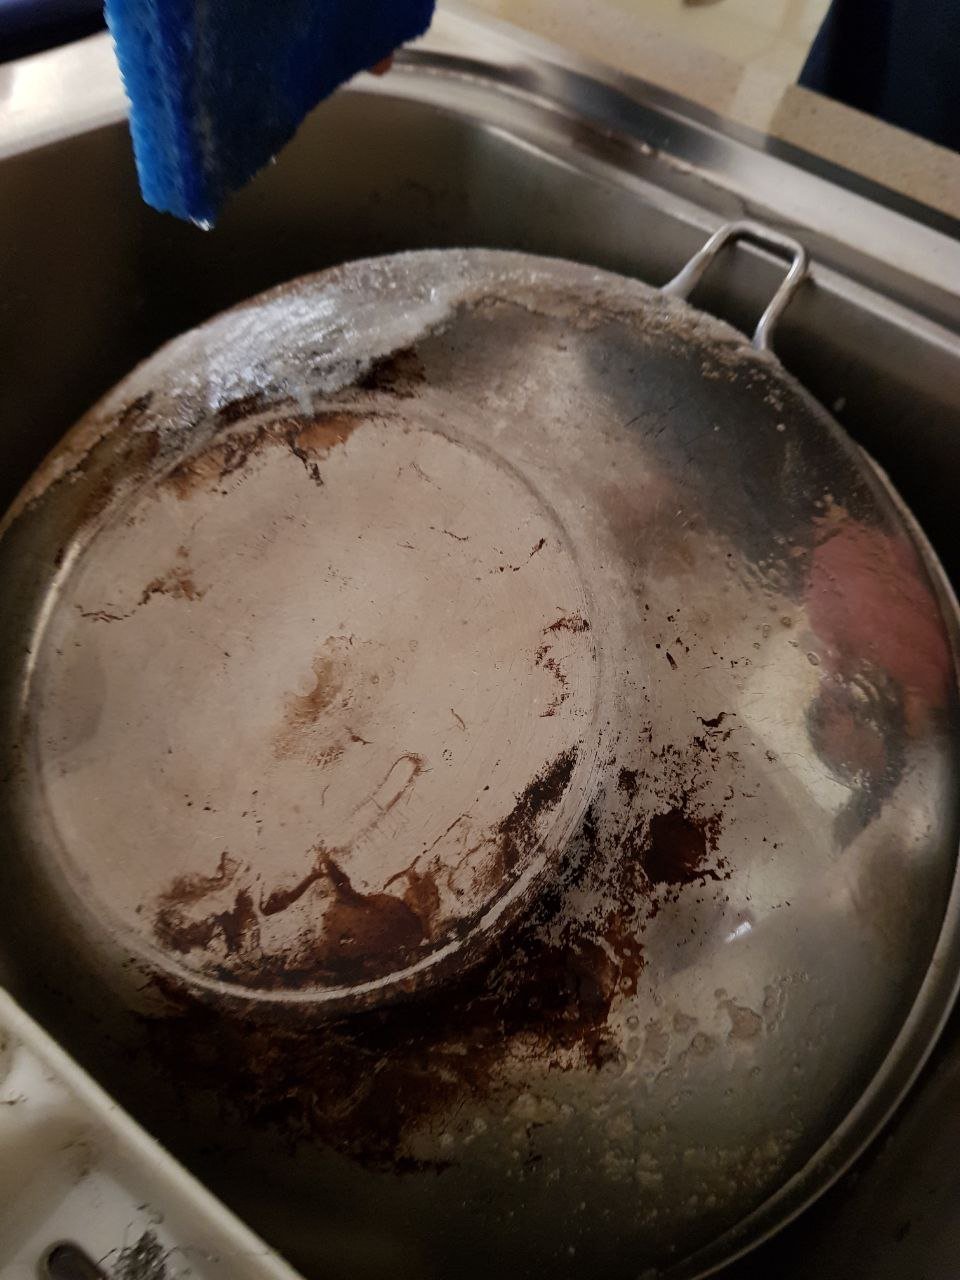
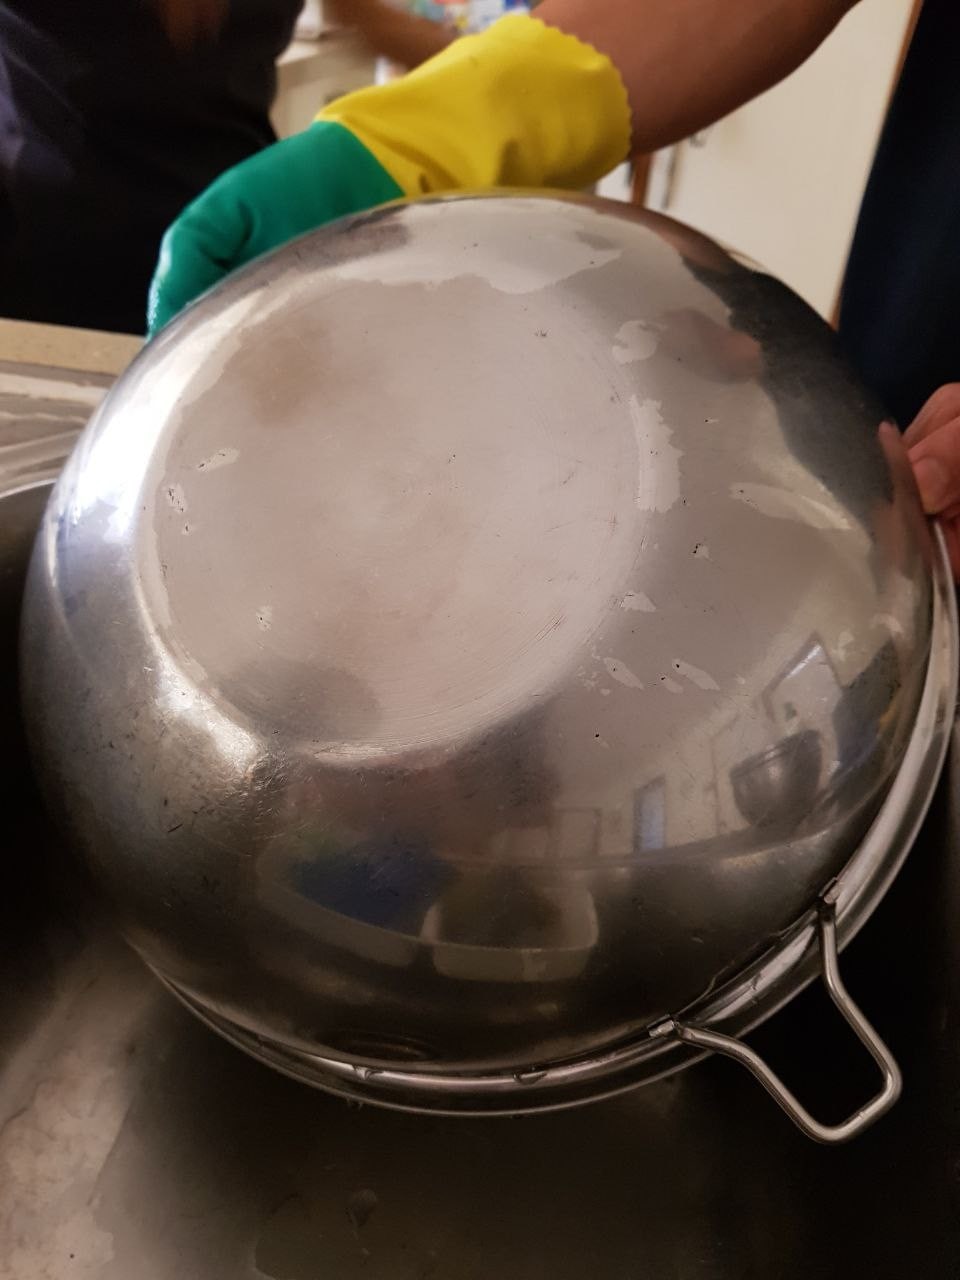
For Stubborn Stains or Stuck-On FoodSoak for 30 minutes (or longer) to soften the stubborn stains. Rinse cookware with warm water and a mild stainless steel cleaner, such as Saladmaster Powdered Cleaner. Create a paste with the powder and a small amount of water, then rub the paste in a circular motion using a damp paper towel. Rinse well in warm, soapy water to remove any remaining cleaner, and then dry using a clean, dry towel. NOTE: For very stubborn stains, make a paste with powder and white vinegar, apply and leave for a few minutes then rub with damp paper towel until clean.
IMPORTANT!Only use warm, soapy water on covers and exterior surfaces. Avoid use of steel wool and abrasive cleaners on the outside of your cookware or on top of the covers, as this may scratch and dull the finish.
It is also advisable to soak in 30 minutes. Do not stack on top of each other while soaking to avoid scratches and damages.
Normal CleaningAfter each use, remove handles and wash both the cookware and handles in warm, soapy water. Rinse and dry. You may also remove the handles and clean your cookware in the dishwasher. Use only non-abrasive cleaners on the handles and avoid cleaning handles in the dishwasher.
For Stubborn Stains or Stuck-On FoodSoak for 30 minutes (or longer) to soften the stubborn stains. Rinse cookware with warm water and a mild stainless steel cleaner, such as Saladmaster Powdered Cleaner. Create a paste with the powder and a small amount of water, then rub the paste in a circular motion using a damp paper towel. Rinse well in warm, soapy water to remove any remaining cleaner, and then dry using a clean, dry towel. NOTE: For very stubborn stains, make a paste with powder and white vinegar, apply and leave for a few minutes then rub with damp paper towel until clean.
IMPORTANT!Only use warm, soapy water on covers and exterior surfaces. Avoid use of steel wool and abrasive cleaners on the outside of your cookware or on top of the covers, as this may scratch and dull the finish.
THE SALADMASTER COOKING METHOD
- Using Your Saladmaster Cookware is as Easy as 1-2-3
- Use the correct size pan and fill it, at least two-thirds full of food.
- Preheat the pan on medium heat prior to use when cooking dense foods like meat or poultry.Preheating usually takes three to five minutes.To tell when a pan is properly preheated, splash a few drops of water on the surface.When the water drops skitter on the surface, the pan is ready to use.For fruits and vegetables, it’s not necessary to preheat the pan.
- Begin cooking by placing ingredients into the pan and cover with a lid over a medium heat setting on your cooktop.Listen for the sound of the Vapo-Valve.When the valve clicks, reduce the temperature to a low setting.Cook according to recipe instructions or desired doneness.
THE SALADMASTER VAPO-VALVE™
When the Vapo-Valve™ clicks, it’s time to turn the temperature to a low setting. On an electric range, that will be the lowest setting. On a gas range, set to the lowest flame without the flame going out or turning off. If the lowest flame is still too high, use a heat-diffusing ring or pad made for gas ranges.
Once the vapor seal has formed around the cover and you’ve lowered the temperature, avoid opening the cover until the food is cooked. Peek if you must, but after replacing the cover, spin it slightly, so the Vapo-Valve™ clicks indicating the cover has resealed itself. If it does not, increase heat slightly, until the valve clicks, then reduce the heat to low.
Once the vapor seal has formed around the cover and you’ve lowered the temperature, avoid opening the cover until the food is cooked. Peek if you must, but after replacing the cover, spin it slightly, so the Vapo-Valve™ clicks indicating the cover has resealed itself. If it does not, increase heat slightly, until the valve clicks, then reduce the heat to low.
COOKING TEMPERATURE & YOUR COOKWARE
Be cautious when cooking on high heat, as excessive heat can cause warping. Also, when the cooking temperature is too high, your food is more likely to stick, scorch or burn. High heat can cause food to shrink and become dry, which can cause a reduction in nutritional value.
It’s okay to bring large amounts of liquid to a boil in Saladmaster cookware, such as water for pasta, over medium high heat. Once the boiling point is reached, reduce the heat to a lower temperature setting. Keep in mind that it is never necessary to set a burner on the highest heat, even when boiling water.
Avoid rapid changes in temperature, such as placing a hot pan in cold water. This can cause stainless steel to warp. Be sure to let your cookware cool first, then add warm water. Never put cold water into a hot pan.
Refrain from placing salt directly on the interior surface of your cookware. When using salt, make sure it dissolves completely to avoid leaving white spots. Salt can cause pitted surfaces.
COOKING WITH SALT
Salt is corrosive to metals and should be carefully used in conjunction with the Saladmaster cooking system. When adding salt to water or other liquids, bring liquid to a boil first and then add salt. Salt can pit and damage the surfaces. Firstly, white spots will be evident and if you acted upon quickly by using Saladmaster Powdered Cleaner, this should remove the white spots. If not, it will likely turn into pitting. The damage is not covered by the Saladmaster Warranty.
COOKING TOOLS & UTENSILS
It is advisable to use wooden and silicon utensils for stirring and cooking. Note that Saladmaster cookware is NOT SCRATCH-PROOF. Avoid using sharp-edged kitchen utensils.
STICKING FOOD
Sticking is usually caused from too high of heat or improper cleaning. Saladmaster cookware is designed to cook on lower temperature settings and high heat is never required.
SCRATCHES
Saladmaster in NOT scratch-proof. You may use anything on the inside bottom of your cookware, even a mixer, you will scratch it, but you will not hurt the cooking ability of the cookware.
To keep the cookware looking pristine on the outside, never use an abrasive on the outside finish. If you want to use a Scotch-brite non-scratch (blue variety) on the inside, feel free to do so, but not on the outside.
To keep the cookware looking pristine on the outside, never use an abrasive on the outside finish. If you want to use a Scotch-brite non-scratch (blue variety) on the inside, feel free to do so, but not on the outside.
DISCOLORATION
Sometimes a slight residue may remain on the cookware after cooking and cleaning. Usually this will appear as a white film. This is primarily, sodium cooked out of foods and calcium deposits that the dishwasher will not remove. This is easily removed by using a stainless steel cleaner such as Saladmaster Powdered Cleaner. Simply rinse the pan with warm water and drain excess water, leaving only a few drops. With this moisture, sprinkle in a small amount of the cleaner to make a paste-like mixture. Using a dry paper towel, rub in a circular motion. Rinse well in hot soapy water to remove all cleaner and dry with a clean soft towel.
It is possible that one of your pieces of cookware will turn blue on the bottom (Rainbow), or even on the inside. Don’t panic. This appearance of blue means only that a high heat has been used for an excessive amount of time. You can scorch anything, even Saladmaster cookware, simply by using high heat. If this does occur, rest assured that it will eventually fade away. Remember, you have not hurt the cookware in this instance, you have simply burned the metal. It is still sanitary and will cook as efficiently and safely.
It is possible that one of your pieces of cookware will turn blue on the bottom (Rainbow), or even on the inside. Don’t panic. This appearance of blue means only that a high heat has been used for an excessive amount of time. You can scorch anything, even Saladmaster cookware, simply by using high heat. If this does occur, rest assured that it will eventually fade away. Remember, you have not hurt the cookware in this instance, you have simply burned the metal. It is still sanitary and will cook as efficiently and safely.
EOC/MP5 CARE
- Fully immersible – with the touch-pad heat control removed, the Skillet can easily be washed in your sink or placed in a dishwasher.
- Water cannot damage the heating element. It is sealed beneath the cooking surface, protected from moisture and corrosion.
- Stores Heat – from kitchen to table, piping hot! The Oil Core holds heat after the Skillet is unplugged. Food stays at serving temperature at the table without an inconvenient cord attached.
- Before the first use, remove the touch-pad heat control. Wash Skillet and cover in hot, soapy water to which you have added once cup of vinegar per 4 liters of water. This removes all traces of manufacturing oils and polishing compounds. Rinse in clear, warm water and dry thoroughly with a clean, soft towel.
- Caution:
- Always remove the touch-pad heat control before immersing Skillet in water.
- Always dry outside of Skillet completely before connecting the touch-pad heat control.
- Refer to the Temperature Guide or use the temperature specified in the recipe to ensure best results.
- When the appliance is turned off, disconnect the cord from the outlet. To transfer it to the table for serving, remove touch-pad heat control (probe), handling very carefully since the touch-pad heat control (probe) will be very hot. It is important to lay the hot touch-pad heat control (probe) on a heat-proof surface to cool to avoid damage to the table or countertop. If food is not being served from the appliance, allow it to cool before removing touch-pad heat control (probe).
- Allow Skillet to cook before immersing it in water for cleaning.
- NOTE: Do not immerse the touch-pad heat control (probe) in water.
- See complete Operating and Cleaning instructions book that comes with the unit.
- Before first use, remove the thin protective film covering the touch-pad heat control (probe).
Cleaning
- To maintain the beauty and cooking efficiency of the Oil Core Skillet, it is important that it be cleaned thoroughly with warm, soapy water after each use. Food films or residues left on the cooking surface will cause discolouration when the Skillet is reheated.
- Although durable, stainless steel is not indestructible. Pitting may result if undissolved salt remains in your Skillet. Salt should be added just before serving foods or to boiling liquids. Liquids should be stirred immediately to completely dissolve the salt. Do not allow seasoned foods or high-acid foods to remain in your Skillet for long periods.
- With the touch-pad heat control removed, your Skillet can be immersed in water or placed in an automatic dishwasher to clean.
- Persistent overheating may cause blue or brown heat tints inside your Skillet (Rainbow). Stains may also result from minerals in certain foods. To polish and remove both heat tints and stains, make a paste with water and a non-abrasive stainless steel cleaner. Do not use a cleaner which contains Chlorine Bleach. Apply paste with a sponge, cloth or damp paper towel, and rub lightly in a circular motion. Wash Skillet again, rinse, then dry with clean, soft towel promptly.
- Remove minor scratches with a non-abrasive stainless steel pad, following the instructions in No.4 above. To prevent scratches, do not cut, scrape, or chop food with sharp-edged kitchen tools in your Skillet.
- To remove the stuck-on foods, fill with warm water and let soak for 30 minutes (or more), then clean with soapy water as usual. A non-abrasive stainless steel pad may also be used, following the instruction in No.4 above.
IMPORTANT:Allow Skillet to cool before cleaning. Do not immerse hot Skillet in cold water. Always remove touch-pad heat control (probe) before putting Skillet in water. Clean Skillet in hot soapy water with a sponge, dishcloth, nylon net or plastic pad. Do not use metal scouring pad, steel/wire wool, knife or harsh scouring powder on the polished stainless steel finish. Rinse the Skillet thoroughly with clear hot water. Dry promptly to prevent water spots with clean, soft towel. Wipe the touch-pad heat control with a damp cloth, then dry.
FOOD PROCESSOR (SALADMASTER MACHINE) CLEANING
Before first use and after each subsequent use, thoroughly clean the unit with a damp, soapy cloth/sponge and rinse with warm water. To retain the mirror-like finish, dry with a soft cloth. Similar to any high quality cutlery, dishwasher use is not recommended as the harsh detergents can dull the cutting cones and the overall finish of the unit. To remove the hopper section for cleaning, hold the base securely and lift the hopper section up and to the left. It should slide off of the base. It is not advisable to immerse the hopper portion of your Food Processor in water. Clean as directed above. To clean the food guide and suction cups simply wipe a damp, soapy cloth/sponge and rinse with warm water. Cutting cones are easily cleaned by holding them under running water immediately after use. Do not leave cutting cones in water or stack them together when wet. Leave them to drip-dry separately or dry them with soft cloth.
ELECTRIC KETTLE
Daily-Use CleaningCarefully clean the inside of the Kettle with warm water and non-abrasive pad. Do not fully immerse the Kettle in water, being careful not to allow moisture to come in contact with the Kettle base. Fill the Kettle with water to maximum capacity marker and bring to boil. Discard the water and dry with a clean, soft towel. Do not clean in the dishwasher. The exterior of the Kettle may be cleaned with a damp soft cloth. To protect the surface of your Kettle, do not use wire wool, abrasive cleaners and pads, or strong acids.
Removable FilterThe Kettle is equipped with a mesh filter that is made of high quality 316Ti stainless steel to eliminate scale deposits when pouring out the water. The filter is removable for cleaning. Simply remove the lid from the Kettle and lightly pull on the stainless steel plate attached to the filter with your finger. Wash in warm water with a cleaning cloth or non-abrasive brush. Dry with a clean, soft towel. Do not clean in the dishwasher. To replace the filter, ensure the stainless steel plate attached to the filter is in the upright position. Slide the filer into the slot behind the spout of the Kettle and push back into position until locked.
Removal of Mineral DepositsIt is common for mineral deposits in tap water to collect inside the Kettle with use over time, which may cause the interior of the Kettle to appear discolored – also called lime scale, which is white or brownish in color an in many case appears as rust. These mineral deposits may be easily removed using vinegar and baking soda.
- Combine two tablespoons of baking soda with one cup of white vinegar. Pour the mixture in the Kettle and fill with water to the maximum capacity marker.
- Place the lid on the Kettle and ensure it is firmly in place. Position the Kettle securely onto the power base and press the ON/OFF switch down.
- Once the heating cycle is complete and the appliance is automatically turned off, unplug the power cord from the power outlet, and allow the Kettle with mixture the stand overnight.
- Discard the cleansing mixture and rinse well the inside of the Kettle.
CAN I PUT THE SALADMASTER COOKWARE IN THE DISHWASHER?
Yes, but first remove the handles and lid counter knob. Over time, repeated washing in the dishwasher could dull the cover knob or handles. We recommend using an energy-efficient air-dry cycle.
AFTER I’VE LOWERED THE COOKING TEMPERATURE AND THE VAPOR SEAL HAS FORMED, CAN I LIFT THE LID?
Go ahead and take a peek! Just make sure that after replacing the lid, you spin the lid slightly so that the Vapo-Valve™ clicks. Indicating it has resealed itself. If you don’t hear the “click”, increase the heat slightly until the valve clicks, then reduce the temperature setting back to low.
WHAT IF MY GAS RANGE COOKS AT A HIGHER TEMPERATURE THAN NORMAL?
If your lowest temperature setting is still too high, you made need to purchase a heat-diffusing pad for your gas stove burner.
CAN I EVER COOK USING HIGH HEAT?
Excessive heat could cause stainless steel to warp. Also, foods are more likely to stick, scorch, or burn. Cooking with high heat can also cause food to shrink, become dry and could deplete nutritional value. It is okay to bring large amounts of liquid to a boil over medium-high heat for when you need to boil water for dry goods like rice, pasta or beans, but reduce the heat to low after the boiling point has been reached
WHY DO I STILL BURN MY CAKE EVEN IT IS ON THE LOWEST FLAME SETTING?
When baking cake, start with medium flame. Do not wait for the Vapo-Valve™ to click as it will NOT click due to low moisture. Once the lid is hot to touch, set the flame to the lowest. Note that some gas ranges’ lowest flame setting is still high for Saladmaster cookware. Control the low setting to near/close to off, i.e., with very very low flame. Your cake will be perfectly baked!!
CAN I CARVE A ROAST IN THE PAN?
Never use sharp utensils to cut foods in the pan to avoid damaging the finish. Remove foods to a cutting board.
WHY DOES THE VAPO-VALVE™ CLICK AS SOON AS I TURN THE HEAT ON UNDER A COVERED PAN? SHOULD I LOWER THE HEAT AT THAT TIME?
The Vapo-Valve™ is designed to click when the food or liquid inside the pan reaches approximately 86˚C. Occasionally, slow clicking begins before the pan has been exposed to heat long enough to reach that level. When that happens, proceed as you would without the premature click. The click should stop as the heat rises. Once the temperature hits approximately 86˚C, the Vapo-Valve™ will click again. This time, the click will be more rapid and insistent, and it is time to reduce the heat to low.
CAN SALADMASTER BE USED ON INDUCTION STOVE TOPS?
Yes. Saladmaster cookware works beautifully on a variety of home cooking surfaces, from induction cooktops, to ceramic, gas and electric – it even works in the oven (without the plastic knobs and handles).